

Spring Cloud Task: Async Processing with Spring Cloud (2/3)


Part 2: Writing a simple Task & interfacing with MySQL
Hello World! Welcome to the 2nd part of a three-part series on asynchronous processing in Spring Cloud. In the first part, I talked (a lot) about Spring Boot and Spring Cloud, asynchronous processing, serverless computing, and Spring Cloud Task as well. But enough said, let’s proceed to write our first Task, and see it run. Once we’re up and running with that, we’ll move to persisting the task history with MySQL. Before you get started, if you haven't read the first part, you can read it here.
Writing your first Spring Cloud Task
Like I said earlier, a Spring Cloud Task is nothing but a Spring Boot project that has a starting time and an ending time. So naturally, we start with an empty Spring Boot project. There are a couple of ways to do this, but, since we’re using Spring Tool Suite (STS), I’m going to use it and as a side note, also show you how cool STS is.
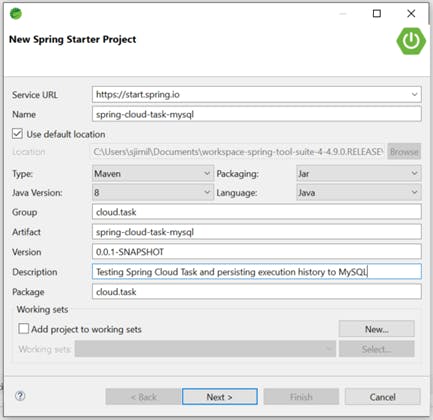
- Open your STS IDE and click as below: File > New > Spring Starter Project. A new project window, as shown below, should pop up:
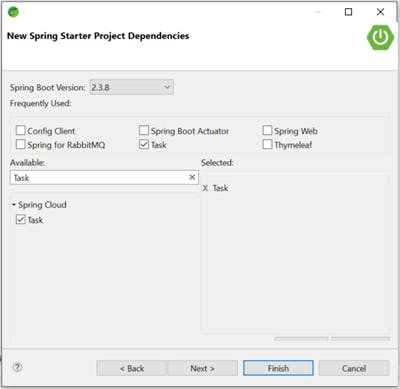
- Click on Next and you should have a form that asks for the dependencies you will need. Select the following:
- Click on Finish. It will automatically download a zip from Spring Initializr and open the project in the STS IDE. If you’re using it for the first time, it will perform Maven sync and it’ll probably take a long time (depending on your PC specs), so, chill for a bit and continue on once it’s completed.
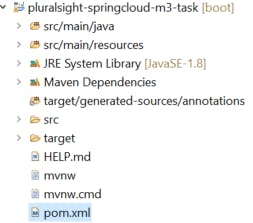
- If you open your Project Structure on the left, you should see a similar structure.
- Open the pom.xml file and verify that you have the following dependency inside the parent.

Writing the Task Logic
If you open up src/main/java folder, you should see a cloud.task package and a main class within it that has the following code:
@SpringBootApplication
public class SpringCloudTaskMysqlApplication {
    public static void main(String[] args) {
        SpringApplication.run(SpringCloudTaskMysqlApplication.class, args);
    }
}
Couple of things to note here:
@SpringBootApplication: This annotation enables your Spring Boot app to do three important things:- Enables auto-configuration so that you don’t have to write configuration XML files.
- Enables component scan (look for
@Componentclasses in the package where this class is located i.e. cloud.task in our case). - Also enables you to register extra
@Configurationbeans for additional dependencies that you may use.
- Code inside the main() method is used to run this application as a Spring Boot app. So, the main() method is the entry point (just like our traditional Java programs).
To make a Spring Boot app into a Spring Cloud Task, all you need to do is use @EnableTask annotation on the main class. And that’s it! Of course, we need to add the logic that the task will perform but that’s how easy setting up and configuring things is with Spring Boot and Spring Cloud. So your modified main class looks as follows:
@EnableTask
@SpringBootApplication
public class SpringCloudTaskMysqApplication { … }
Under the hood, @EnableTask is doing a lot of stuff for us. If you’re not interested in the details, it’s completely alright but I’m a bit of a nerd so I’m going to get into a little detail.
@EnableTasktells Spring Cloud Task to bootstrap its functionality which I like to think of as trying to say “set up its functionality before it starts to execute”.- This setup is done by importing an additional configuration class –
SimpleTaskConfiguration. This class is responsible for registering theTaskRepositoryand the infrastructure for use. TaskRepositoryis responsible for recording the results of the Task. By default, it does not persist those results and they are stored in an in-memoryMapdata structure.
Now is the time to provide the Task’s implementation. You can copy and paste the entire block of code below and I’ll explain what it all means after that:
import org.springframework.boot.CommandLineRunner;
import org.springframework.boot.SpringApplication;
import org.springframework.boot.autoconfigure.SpringBootApplication;
import org.springframework.cloud.task.configuration.EnableTask;
import org.springframework.context.annotation.Bean;

@SpringBootApplication
@EnableTask
public class PluralsightSpringcloudM3TaskApplication {

    public static void main(String[] args) {
        SpringApplication.run(PluralsightSpringcloudM3TaskApplication.class, args);
    }

    @Bean
    public TollProcessingTask tollProcessingTask() {
        return new TollProcessingTask();
    }

    public class TollProcessingTask implements CommandLineRunner {
        @Override
        public void run(String...strings) throws Exception {
            // parameters stationID, license plate, timestamp
            if(null != strings) {
                System.out.println("Parameter length is: " + strings.length);

                String stationId = strings[1];
                String licensePlate = strings[2];
                String timestamp = strings[3];

                System.out.println("Station ID is: " + stationId +
                        " | License Plate is: " + licensePlate +
                        " | Timestamp: " + timestamp);
            }
        }
    }
}
Okay, so let us break down the code:
- We use an inner class
TollProcessingTaskand it implements theCommandLineRunnerinterface. This interface simply lets you perform some action, immediately after the application has started. - We override the
run(String…strings)method from theCommandLineRunnerinterface. This is the method that holds the business logic of the Task. If you have a look at the method’s definition, it contains a simple print to console of two values – the number of parameters that the task received when it was run, and the value of those parameters. - NOTE: Parameter values are accessed from the 1st index (2nd position) in the array since the 1st element is a flag that is embedded automatically when we run the app from our IDE. That flag is of no use to us since it’s not a value that was passed as an argument.
- Now this inner class has all our logic but our main application is unaware of this. When the application is run, this class has to be injected as a
Beanin the application context. @Beanannotation is used to register the return value of a method that it is used on as a Bean within aBeanFactoryin the application context (simply meaning making it available for use).
Running the Spring Cloud Task
Okay, so we have our Task ready. How do we run this and how do we pass the command line arguments? You can build a JAR file and execute it from the command-line, pass the arguments there. I’m not going to do that and I’ll take this opportunity again to show some cool features of STS (well really, all Java IDEs have this feature).
In the Package Explorer on the left-hand side, right-click on your project > Run As > Run Configurations. Make sure that your project is selected in the left-hand pane. Switch to the Arguments tab in the content area and add your arguments on separate lines in the Program Arguments textarea.
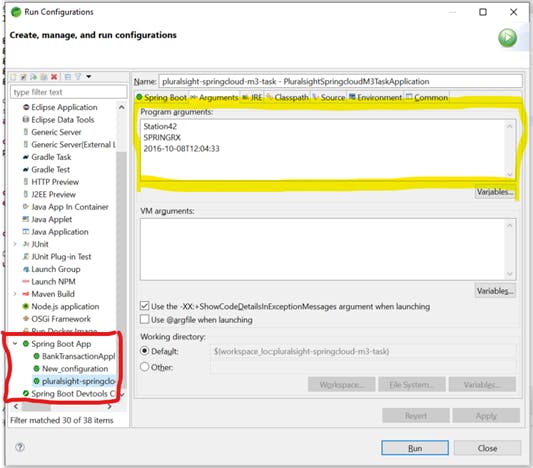
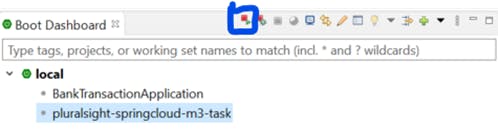
We are now ready to run the application. There will be a Boot Dashboard in the bottom left area of your screen. Click on the first icon (highlighted inside the blue box) after selecting your application.
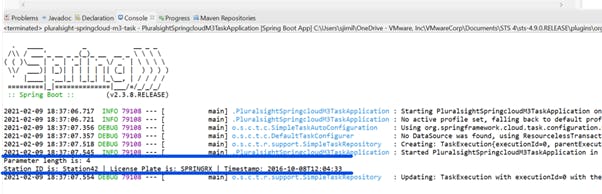
Upon successful execution, you should see the following output:
Interacting with a MySQL Instance in Docker
We saw the Task perform its business logic (printing parameters out to the console). Now, we want to persist data about this task’s execution, including, its start time, end time, what parameters it received, if there was an exit message in case the exit was due to a failure, etc. As we saw in the first post, SQL databases are supported out of the box and I am going to use MySQL. I don’t want to set up a MySQL server locally on my laptop though. So with Docker installed, let’s use it to our advantage. We will start a Docker container, based on the mysql image and expose it to our localhost using simple port mapping. And we should be able to have our JDBC driver connect to it.
- Open up a command prompt and type the following command:
docker run -p 3306:3306 --name test_mysql_instance -e MYSQL_ROOT_PASSWORD=<your password here> -d mysql:5.6-p 3306:3306specifies our port mapping, the format is -p :-e MYSQL_ROOT_PASSWORD=<your password here>is used to set up an environment variable inside the container that will, later on, be used to connect to the database-dinstructs docker to run the container in detached mode (i.e. return to the host command prompt and let container run in the background)
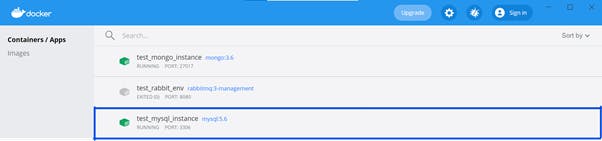
- If your container ran successfully, you should see it in Docker Desktop:
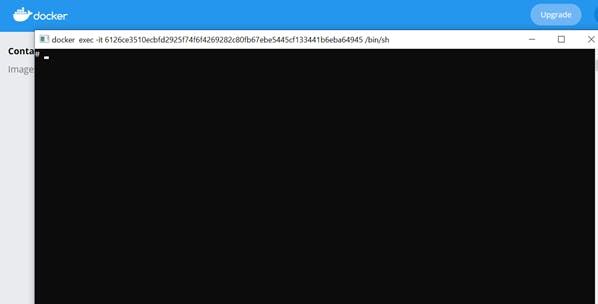
- If you hover that entry, you should see a > _ option (2nd from the right) which basically allows you to exec into the container and run commands inside it. Click on it and the following command prompt should open. Note the “docker exec …” in the window name on top.
- Log into your mysql database using the following steps:
> mysql -u root -p- It will prompt you to enter the root password. This is the one that you provided in the docker run.. command earlier.
- Create a new database that Spring Cloud Task can use to store the task history.
mysql> CREATE DATABASE tasklogs
- Leave this prompt running and switch to STS. Open the pom.xml file once again and add the following dependencies for connecting to MySQL:
<dependency> <groupId>mysql</groupId> <artifactId>mysql-connector-java</artifactId> </dependency> <dependency> <groupId>org.springframework.boot</groupId> <artifactId>spring-boot-starter-jdbc</artifactId> <version>2.4.2</version> <type>module</type> </dependency> - Open the application.properties file inside the src/main/resources folder. This file basically contains all the configuration properties like JDBC url, passwords, encryption keys etc. that are going to be used by the app. Add in the following properties:
spring.application.name=Toll Processor logging.level.org.springframework.cloud.task=DEBUG spring.datasource.url=jdbc:mysql://localhost:3306/tasklogs spring.datasource.username=root spring.datasource.password=<password-used-in-docker-run-command> spring.datasource.driver-class-name=com.mysql.jdbc.Driver - And that’s it! Now that you’ve provided a link to the database to Spring Cloud Task, the TaskRepository will take care of creating the schema and inserting data into it whenever the Task is run. To verify, save all the changes and run the app again. You should see the same output as before.
- Switch to the command prompt we left running earlier and check the tables in the database.
mysql> use tasklogs;
mysql> show tables;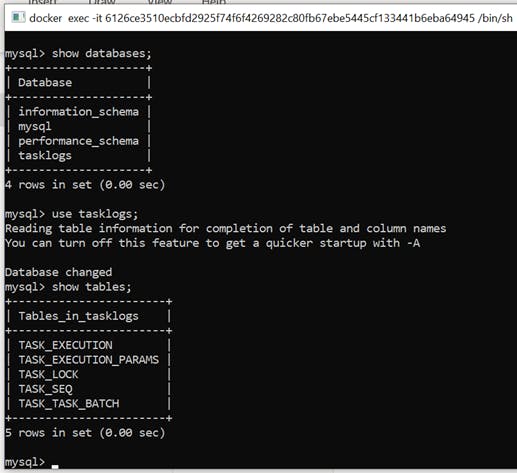
- To verify if the information was stored, execute the below SELECT query:
mysql> SELECT * FROM TASK_EXECUTION_PARAMS;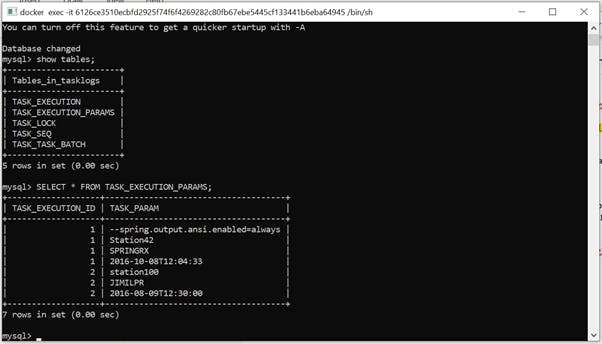 You will see as many distinct TASK_EXECUTION_ID values as the number of times you executed the task and, each parameter that was passed to the task.
Thank you for reading till here. Part 3 will be uploaded soon. In Part 3, I am going to discuss a real-world scenario where you could use Spring Cloud Task and demonstrate it using RabbitMQ and Spring Cloud Stream.