

Spring Cloud Task: Async Processing with Spring Cloud (1/3)
Part 1: What is Spring Cloud Task?
Spring Cloud is a growing project and if you’ve ever come across developing microservices in Java (preferably using the Spring Boot framework), there are high chances that the development entails the use of various starter modules from the Spring Cloud project. Let me take a step back and give a quick overview of Spring Boot and Cloud (feel free to skip to the main article section directly if you know what these technologies are).
Spring Boot is one of the projects in the very large Spring ecosystem, meant to provide an opinionated view of Spring applications. What that means is, let’s say that you want to create a RESTful application. In the typical Spring environment, you would have to spend a lot of time configuring stuff in XML files that described those configuration beans. However, Spring Boot says, “Hey! If you want to create a RESTful web application, why not use the Spring Web starter?” Spring Web starter provided by Spring Boot simply sets up the configuration for you. For example, it gives you an Apache Tomcat server and says, “In my opinion, this is the best way to create a RESTful web application in Spring. You can use this or you can override my opinion and use something that may suit your needs better.” And just like that, your focus changes to code rather than configuration.
Spring Boot made it easy to develop and deploy production-grade Spring applications, or monoliths. However, soon, the microservices architecture came into the picture. According to Adrian Cockcroft (cloud architect at Netflix, one of the leaders in microservices development & deployment), microservices are
“loosely coupled service-oriented architecture with bounded contexts”.
So to make the building of common distributed systems pattern easily consumable by developers, Spring Cloud came into the mix. Spring Cloud is specially optimized for Spring apps providing seamless integrations, but, can be consumed by other technologies over HTTP protocols. And, it includes a bunch of Netflix OSS technologies, like Eureka, Ribbon, Zuul, Sleuth, etc. for developing & monitoring your microservices.
In this three-part series, I am going to talk about a specific project in Spring Cloud – called Spring Cloud Task. This first blog is going to talk about the following:
- What is Asynchronous Processing and why is it important?
- What is Spring Cloud Task?
- How can Serverless computing be leveraged when using Spring Cloud Task?
- What is the business logic inside a Spring Cloud Task?
- What about the Task’s execution history and auditing?
- Installation guides for all the necessary tools that are going to be required throughout the next two parts.
Asynchronous Processing
An asynchronous process usually identifies a process that is executed in the background without having the user or other independent processes wait for it. The below illustration gives a very simple explanation of how it is different from the synchronous process:
 Asynchronous processes play a critical role in microservices architecture because they aid in reducing dependencies between services. Asynchronous processes ensure that services don’t have a hard coupling between their remote procedure calls and instead they can be linked with a lightly-integrated bus. This allows for easier decoupling of your monolith’s services and an easy transition into microservices.
Asynchronous processes provide low latency and high throughput. Since calls between services are non-blocking, the overall latency is reduced as no service waits for another service to complete its execution. Also, with decoupled services developed & deployed independently, you have more fine-grained control over scaling i.e. you don’t scale all your services (typically the case when horizontally scaling your monoliths), you only scale those that experience very high loads and thus, require greater availability. Your throughput increases, while limiting the number of additional resources you use for scaling to the bare minimum.
Lastly, asynchronous processes facilitate event-driven computing. Listeners waiting for an event, on its occurrence, can trigger some actions in some other services without requiring the publisher (source) of the event to wait for the action to complete.
Serverless Computing and Spring Cloud Task
According to Cloudflare,
“serverless computing is a method of providing backend services on an as-used basis. A serverless provider allows users to write and deploy code without the hassle of worrying about the underlying infrastructure.”
This means that your focus, again, is on developing & providing that code block or function to the serverless provider (also called, Function-as-a-Service, or FaaS platform) and the provider looks after the deployment. Further, these platforms support automated horizontal scaling to take care of different scenarios that might arise in production.
Spring Cloud Task is used to build these short-lived tasks that run on the serverless computing model. It takes this idea that a Spring Boot app can have a starting time and an ending time and still be successful. It allows users to develop and run short-lived microservices using Spring Cloud. These tasks can be run seamlessly with Spring Boot apps, as a step of a Spring Batch job, with Spring Cloud Stream, and even as part of a data pipeline built using Spring Cloud Data Flow. The basic steps involved in developing a Spring Cloud Task are as follows:
- Create an empty Spring Boot project and include the necessary dependencies in the pom.xml file
- Annotate the main class with
@EnableTask - Add business logic that the task will execute
- Deploy the task (to a local Maven repo, Kubernetes cluster, or even to a Cloud Foundry space)
Business Logic of a Spring Cloud Task
A Spring Cloud Task is a regular Spring Boot application and has all the regular access to beans that Spring Boot apps have. A Task, however, is stateless and so, you do not have to worry much about maintaining its state. The result that the Task produced, called the outbound state, must be logged to either a File System or any other storage object if it is required by some other services later.
The Task itself is bootstrapped using a command-line runner or application runner interfaces in Java & you can use multiple runners. The Task isn’t completed until all the runners have been executed. Spring Cloud Tasks aid in event-driven computing and you can also subscribe to the different lifecycle events of the Task itself.
Spring Cloud Task’s execution history
As of the date of publishing of this article, Spring Cloud Task provides out of the box support for various relational databases for storing an executed task’s results. Currently, the following databases are supported:
- DB2, H2
- HSQLDB
- MySQL
- Oracle
- Postgres
- SqlServer
The best part about this support is that you don’t need to write any additional code or SQL queries to store the result. You simply provide a connection URI to one of the above-mentioned databases to the relevant JDBC driver and the entire schema is built by Spring Cloud Task. Insertion of task’s results is also done automatically.
Environment Setup
To follow along with the demos in the next two parts, I am assuming that you have Java installed and the appropriate environment variables set. I’m going to provide quick guides for installing everything that I have used while developing these demos:
- IDE – I use Spring Tool Suite 4, which is a great IDE for Spring development. You can use any other IDE of your choice. (If you don’t use STS, verify if your IDE of choice provides a Maven installation. If it does not, you must install Maven on your system).
- Docker – Docker is a container engine. I used Docker to spin up MySQL databases and RabbitMQ environments so that I don’t have to install them locally on my computer.
Installing Spring Tool Suite (STS) 4.0
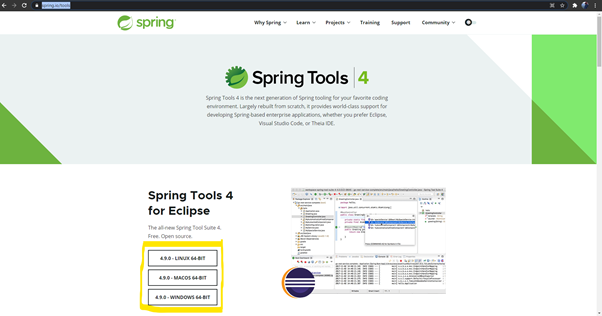
- Download the STS 4.0 IDE from the following link- STS 4.0 and select the appropriate file according to your operating system.
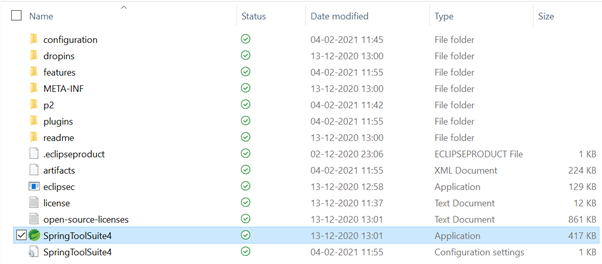
- This will download a .zip file. Go to the download location and unzip the file. The extracted contents should look as below:

- Navigate to the /sts-4.9.0.RELEASE folder and look for the STS exe. Double-clicking it should open the STS IDE.
Installing Docker
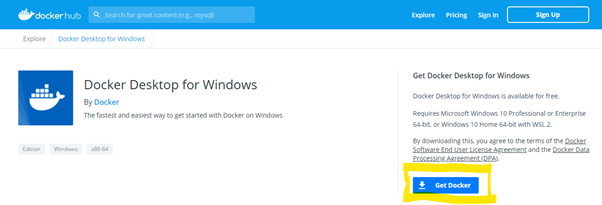
- Visit the following site- Docker Desktop and click on the Download from Docker Hub button.

- On the page you are redirected to, click on the “Get Docker” download button on the right.
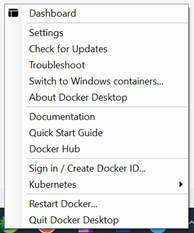
- This downloads an executable installer for Docker Desktop. Double-clicking and simply following the wizard should install Docker Desktop correctly. (Note: Once the installation is complete on Windows, it will prompt with a link to WSL2 installation. Follow that prompt and restart your computer upon completion.) You should be seeing a Docker icon in your system tray.
Thank you for reading till here. In Part 2, I am going to demonstrate how to write a simple Spring Cloud Task and how to interface it with a MySQL database to store its execution history. You can read Part 2 here.